Elite PI Software
This section contains support articles regarding the Elite PI® Software.
You can find articles on the Elite PI® Legacy Designer, the Elite PI® Legacy Transfer and the ECM (Elite Content Manager).
ECM (Elite Content Manager) *NEW*
Here at C.E. Electronics, we are pleased to announce our new Elite Content Manager, or ECM for short. The ECM gives you the ability to manage the content of your Elevator screens like never before. Within one program you can manage the network connectivity of your Elite PI PRO screens as well as create graphic announcements to get time sensitive information to your customers and tenants. In this article, we will go over the features of the ECM and give you a brief tour of everything that it can do.
WELCOME!
Here is the new ECM. Lets take a look at each navigational menu item and dive a little deeper into the functions of the ECM.
HOME:
The HOME screen gives you an overview of your connected Elite PI PRO screens. Here you can quickly access your design library, your Elite PI PRO screens, your Elite+ subscription status, and any display messages from the C.E. Electronics software development team.

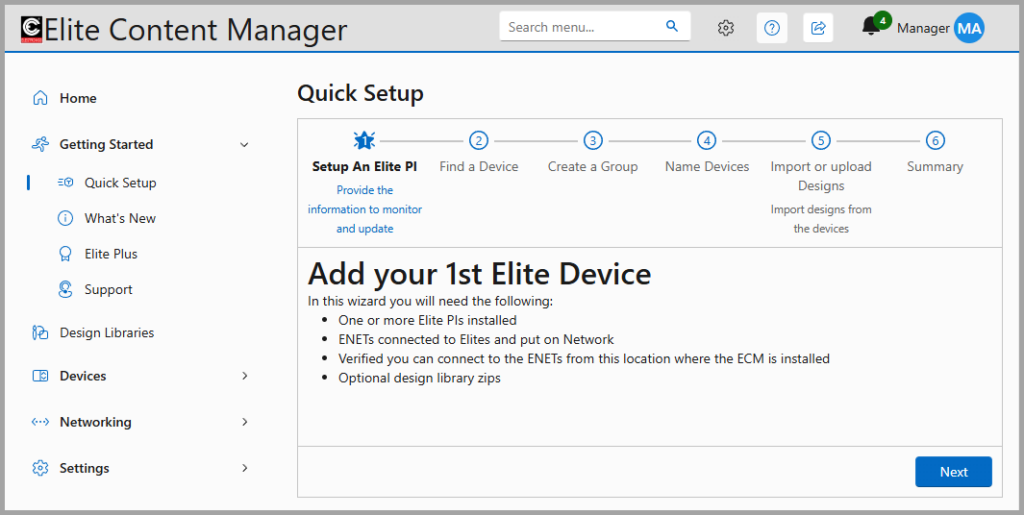
GETTING STARTED:
The “Getting Started” page is where you will find the “Quick Setup”. The Quick Setup will walk you through scanning your network to detect and connected ENETs and adding any Elite PI PRO screens that are connected to those ENET networking routers. In the “Getting Started” section, you will also find the “What’s New”, “Elite Plus”, and “Support” pages. “What’s New” will have patch notes from any new software versions. “Elite Plus” contains information regarding the C.E. Electronics Elite+ subscription program for live news, stocks, and weather. “Support” has the contact information for the C.E. Electronics support teams.
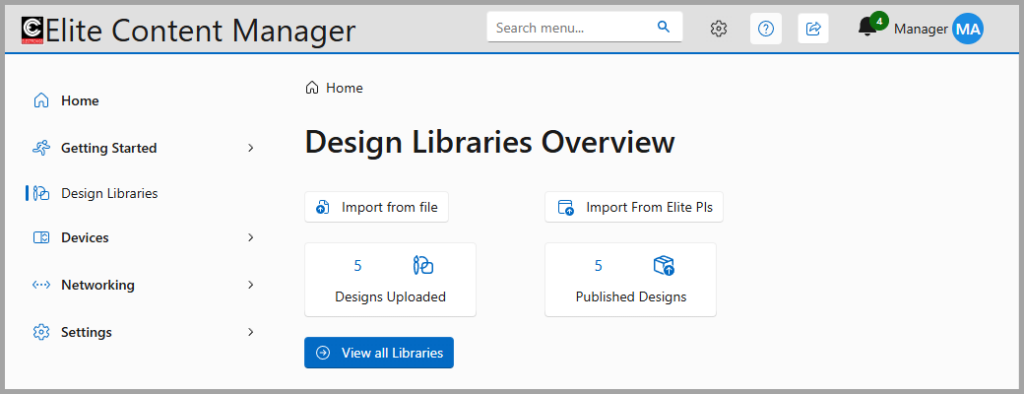
DESIGN LIBRARIES:
The ECM keeps a library of all designs that you create for your elevator screens and stores them in the ECM design library. From here, you can import designs, download designs that are currently on your Elite PI screens, and edit any current design that are stored in the device library. When you make a change to a design, you create a new version of that design. When you upload a design to an Elite PI PRO screen, that version is locked and stored to the design library. To update that design, all you have to do is create a new version of the locked design.
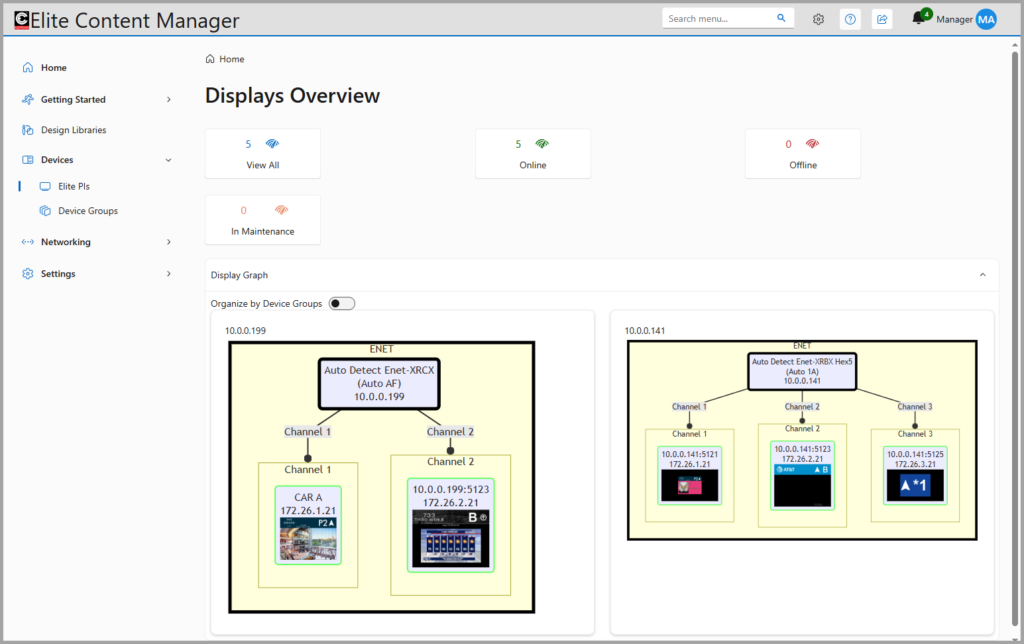
DEVICES:
Within the “Devices” section, you can see the status of all your connected Elite PI PRO screens. You can see any screens that are online and fully operational, any screens that are offline and not communicating, or any screens that require updating or maintenance. From here, you can also see a graph of all the connected Elite PI screens and what ENET networking router they are connected to.
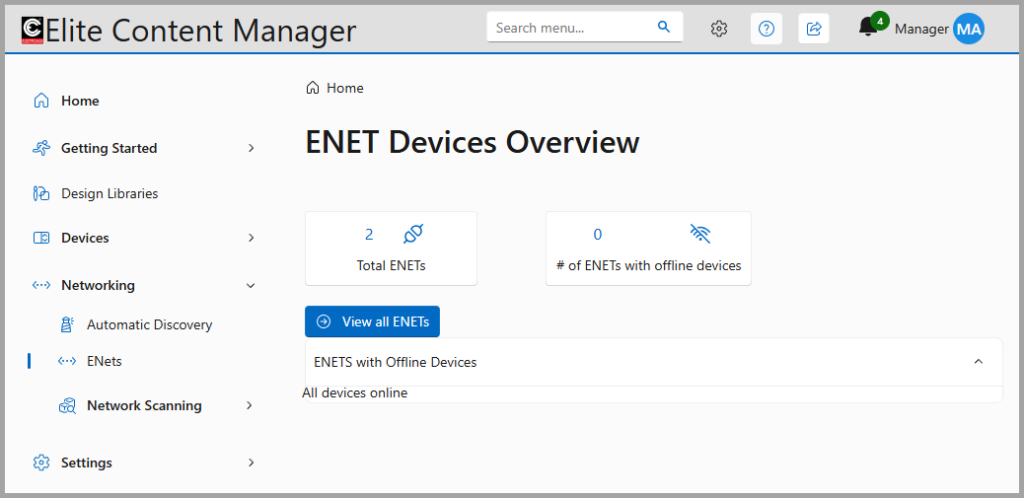
NETWORKING:
THE “Networking” section is where you will view all the ENET networking routers. This section is primarily used for troubleshooting and maintenance as well as the first time setup of the ECM.
SETTINGS:
Lastly, the “Settings” section contains all ECM settings. Here you will find any running Elite+ subscriptions, the ECM system log, ECM system notifications, ECM background operations, User permissions and individual account settings, and software updates for individual Elite PI screens.
The first time that you open the ECM software, you will be prompted to login. It will be at this point that you will change the admin password. When you first installed the ECM, you should have open the ReadMe file which contains the admin username and password to use to log in for the first time. If you need to find the ReadMe file again, you can find it here at this location on your PC.
C:Program FilesCE ElectronicsElite Content Manager
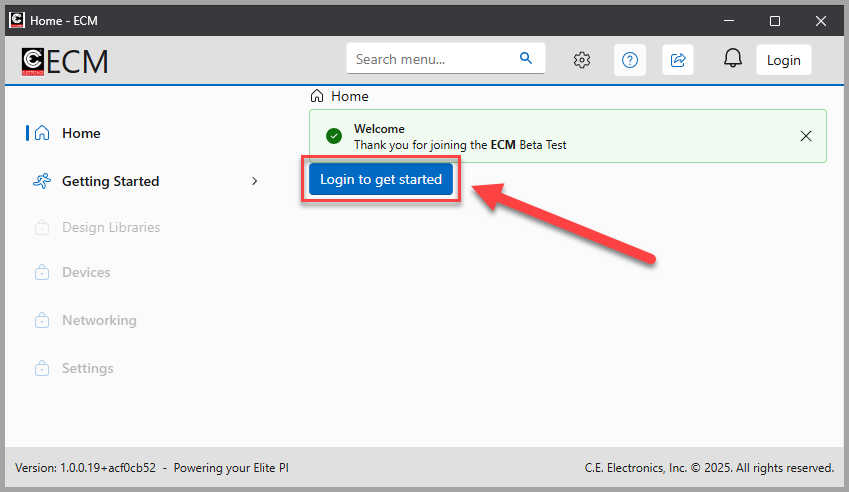
STEP 1.
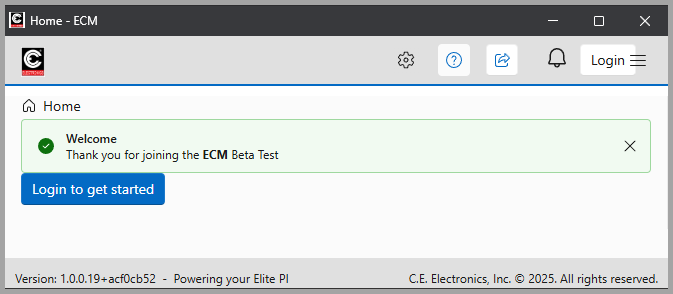
Open the ECM software and click “Login to get started”
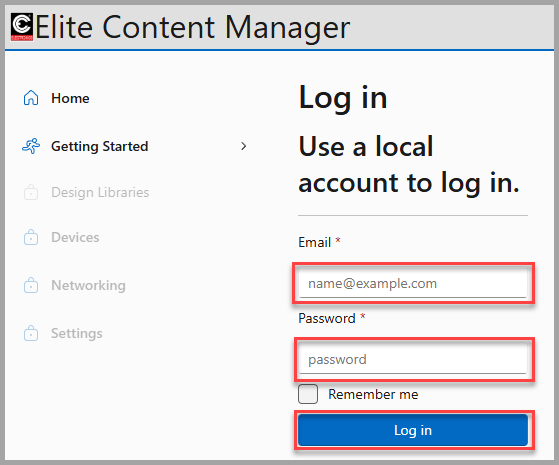
STEP 2.
Enter the email and password that was noted in the README file and click “Log In”
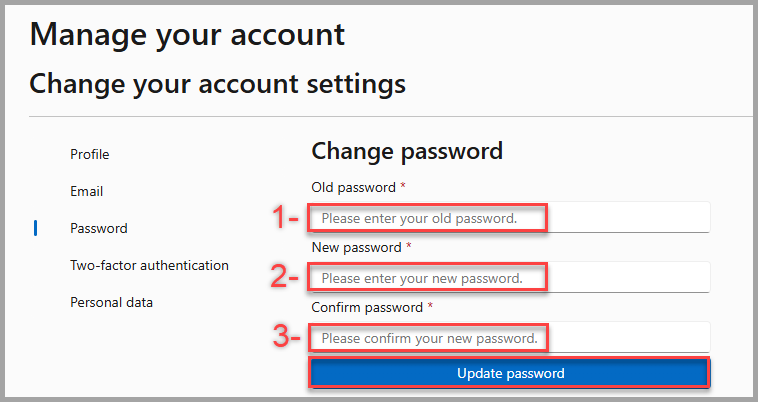
STEP 3.
You will now be prompted to change the default admin password. 1-Enter the old password that was noted in the README. 2-Enter a new password. 3-Confirm the new password a second time. When updating the new password, it must meet the following criteria:
After you have entered the new password, click “Update Password”
You will now be logged into the ECM under the admin account.
In order to install the Elite Content Manager (ECM) to a host PC, please follow these steps. We recommend that the PC that will host the ECM software should NOT be an employee’s personal computer, but rather a shared work space. This PC must also be left on at all times.
STEP 1.
Download the installer software. There are 2 options, the STABLE build and the BETA build. The stable build has been tested to be more reliable and fewer bugs. The beta build is constantly being updated with newer features but has not been tested as much as the stable build.
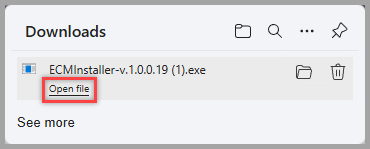
STEP 2.
Click “Open file”.
STEP 3.
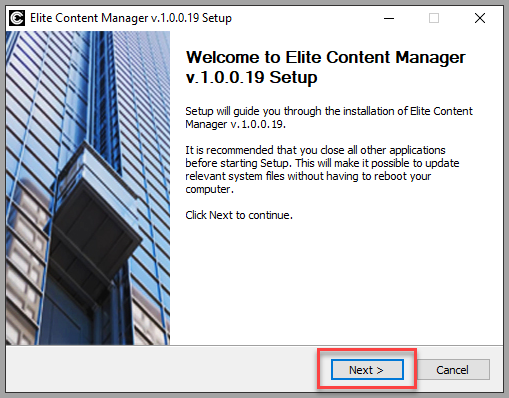
The installation wizard for the ECM will now open. We recommend that you restart your PC after the installation process, so make sure that all other programs are closed and that your work in those other programs has been saved.
Click NEXT
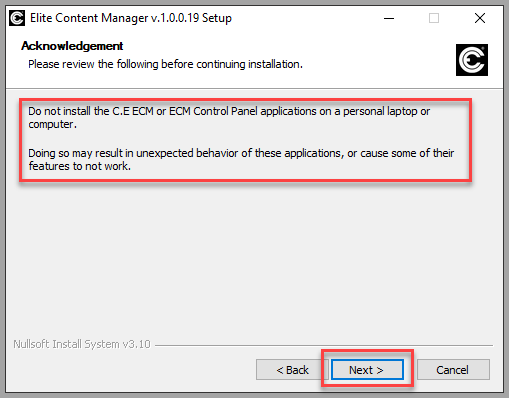
We also recommend that the ECM not be installed on any personal computer or a computer that gets shut down at the end of the day. The ECM should be installed on a shared work space that is left on 24/7. There could be issues that would occur if the software is installed on a personal PC.
Click NEXT
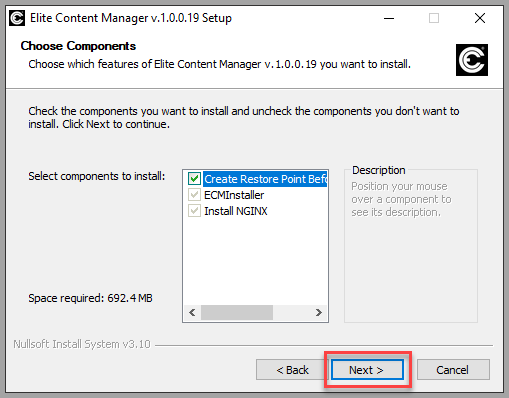
Click NEXT
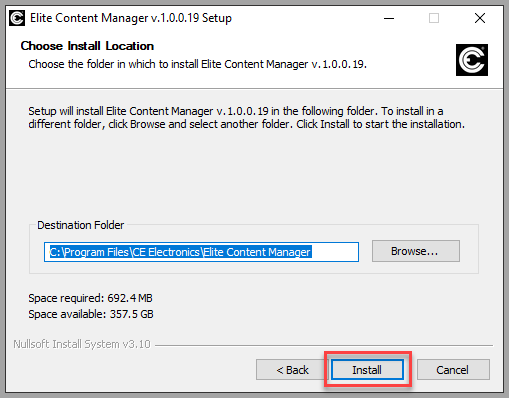
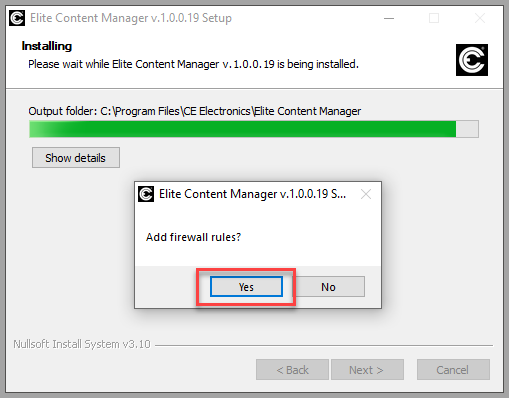
Click INSTALL
When you see a window pop up asking to add the firewall rules, click yes.
When the installation has finished, be sure that you select the box to open the ReadMe file and then click FINISH. The ReadMe file is very important as it contains information regarding first time login details.
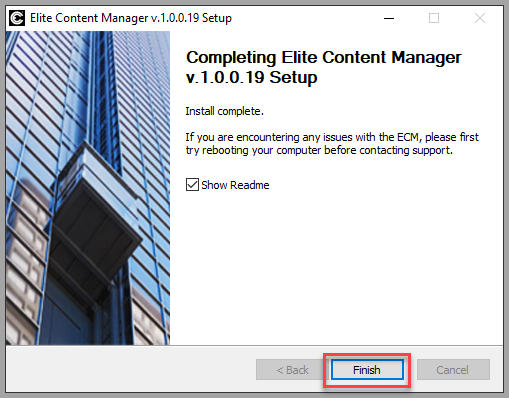
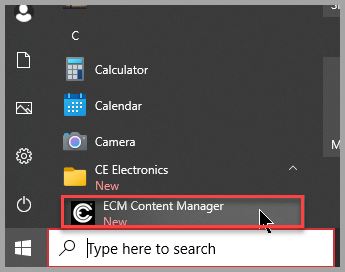
Now you have installed the ECM. You can find it in your programs listing in the CE Electronics folder.
Download
resetCEDefaults.rsc
Download
Hex5CeDefults.rsc
Download
RB3011CeDefaults.rsc
Download
setstatic.rsc
In the event that you need to delete the ECM software for any reason, please follow these steps.
STEP 1.
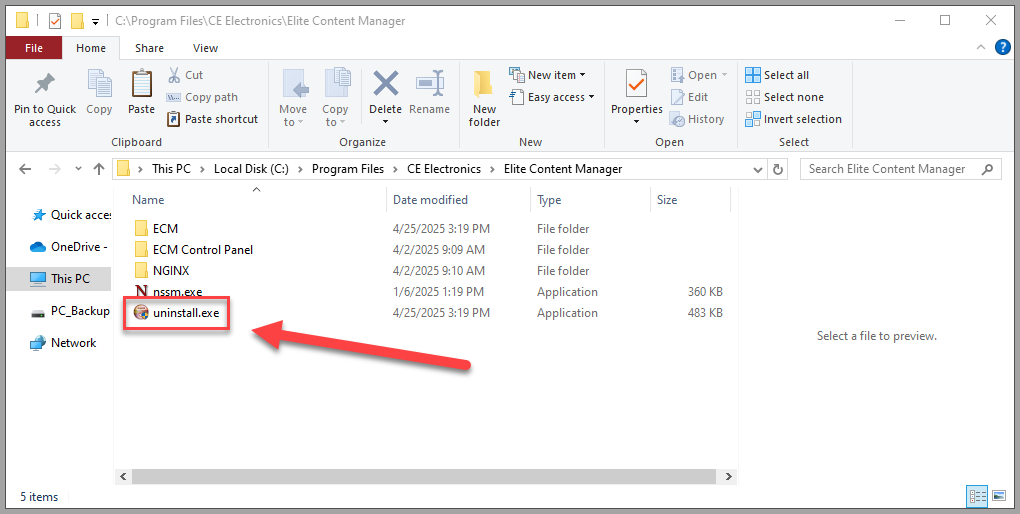
Locate the uninstall.exe file in the Elite Content Manager folder and double click it. If you receive a pop up asking if you want to allow this app from an unknown publisher to make changes to your device, just click yes. The file can be located at this address – C:Program FilesCE ElectronicsElite Content Manager
STEP 2.
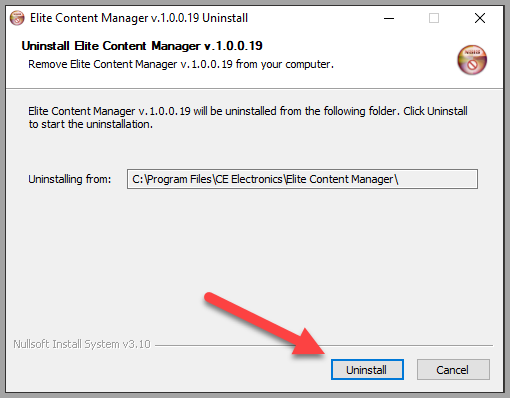
Click Uninstall
Delete the ECM software

In the event that you need to delete the ECM software for any reason, please follow these steps.
STEP 1.
Locate the uninstall.exe file in the Elite Content Manager folder and double click it. If you receive a pop up asking if you want to allow this app from an unknown publisher to make changes to your device, just click yes. The file can be located at this address – C:Program FilesCE ElectronicsElite Content Manager
STEP 2.
Click Uninstall
STEP 3.
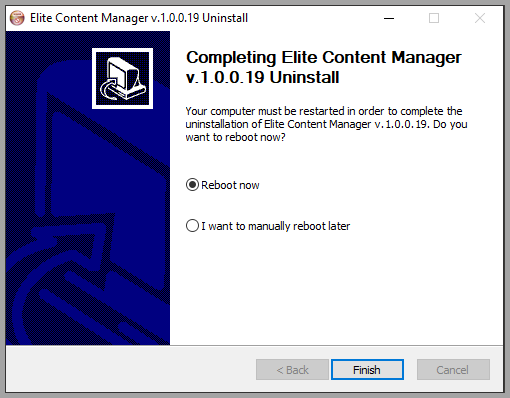
Once the software has been uninstalled, we recomend rebooting your PC. You can either choose to do that now, or at a later date. Once you click finish, the software will be deleted, and your PC will reboot if you choose that option.
In the event that you have forgotten your login credentials, you will need to reenable the admin login. To do this, please follow the following steps.
STEP 1.
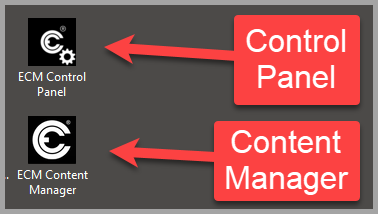
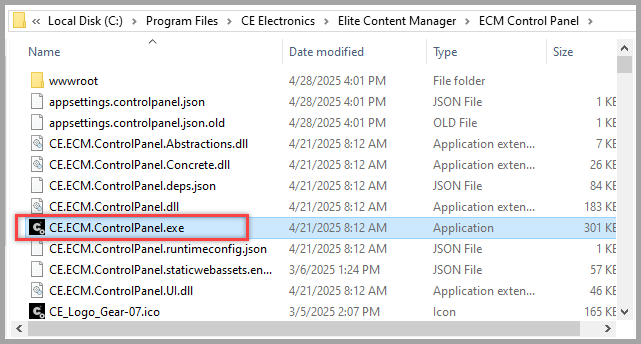
Locate the ECM Control Panel application and open it. Note that this is a separate program from the stock ECM program. You are specifically opening the control panel. The ECM program and the ECM control panel should be located on your desktop, or the control panel can be found at this address.
C:Program FilesCE ElectronicsElite Content ManagerECM Control Panel
If you receive a pop up asking if you want to allow this app from an unknown publisher to make changes to your device, just click yes.
STEP 2.
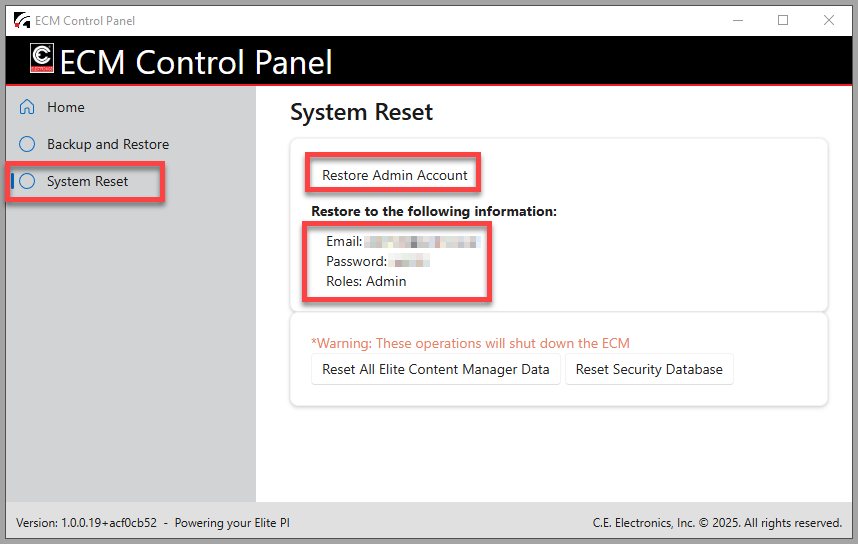
Click on “System Reset” and then click “Restore Admin Account”. This will add the admin account with the login credentials listed below. You would then use those login credentials to access the ECM.
STEP 3.
Now when you go back to the ECM program, you will use the admin login credentials. Use this guide to login as admin and change your password same as the first time the ECM was installed on the PC.
See second article First time opening the ECM software – C.E. Electronics
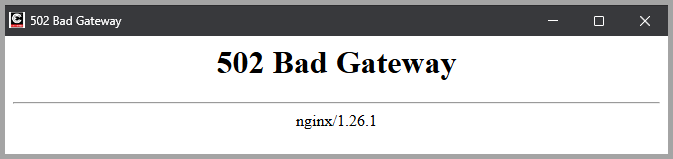
It is possible that your PC may stop a required service function and when that happens, you will see this error when you open the ECM.
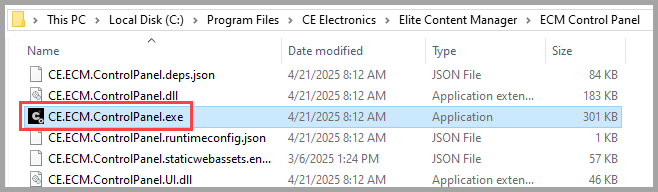
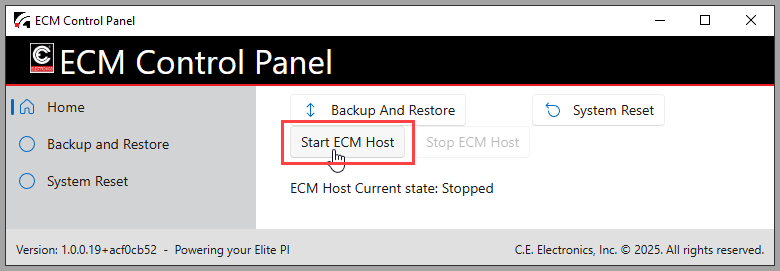
If you see this error, all that you need to do is open the ECM Control Panel and restart the ECM host. To do this either click on the short cut on your desktop that looks like this.

Or you can go to this file location.
C:Program FilesCE ElectronicsElite Content ManagerECM Control Panel
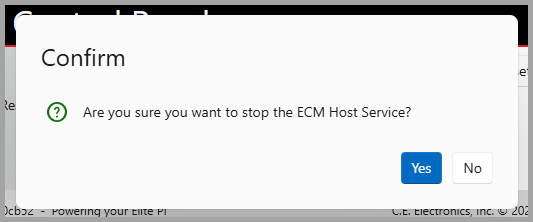
Once the ECM Control Panel opens, click on “Stop ECM Host”
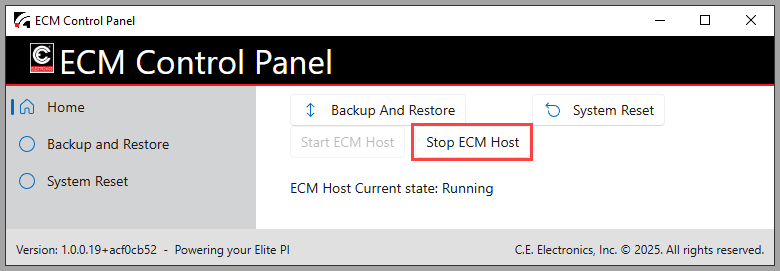
Click yes
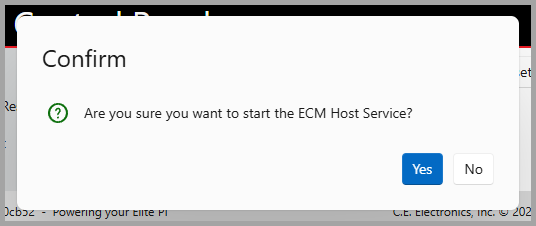
Click “Start ECM Host”
Click yes
Finally, re-open the ECM program. Everything should be working.
Elite PI® Legacy Transfer Software
There may be some instances where the ENET networking device changes its IP address. This typically happens during a network wide reboot or a power outage. The ENET is configured to DHCP, so these event could trigger the ENET to latch on to a different IP address then what was previously used. If this happens, please follow this guide to update the IP address settings for an ENET in the Elite PI Transfer program.
STEP 1.
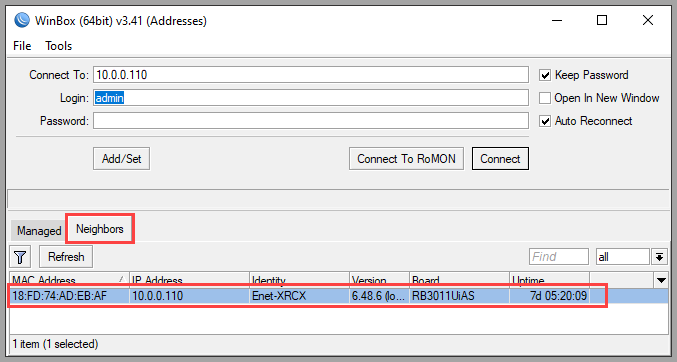
Please follow this guide to obtain the IP address of the ENET using the Mikrotik WinBox program.
See the last article of this section – Using the MikroTik WinBox application to check for and ENETs IP address
STEP 2.
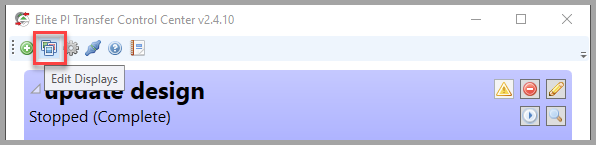
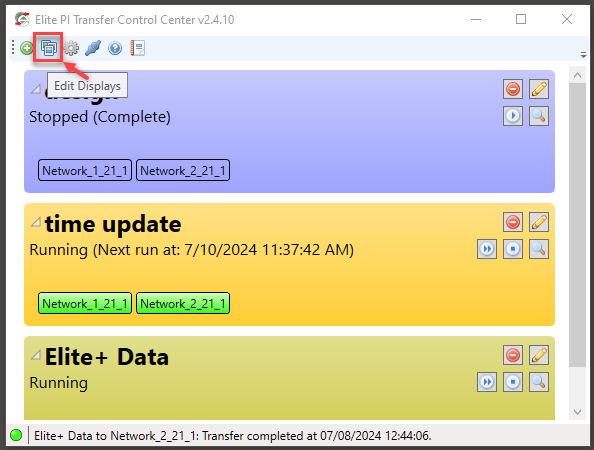
Now that you have the new IP address, you will want to update the existing IP address stored in the Elite PI Transfer program. Open the Elite PI Transfer program and select “Edit Displays”
STEP 3.
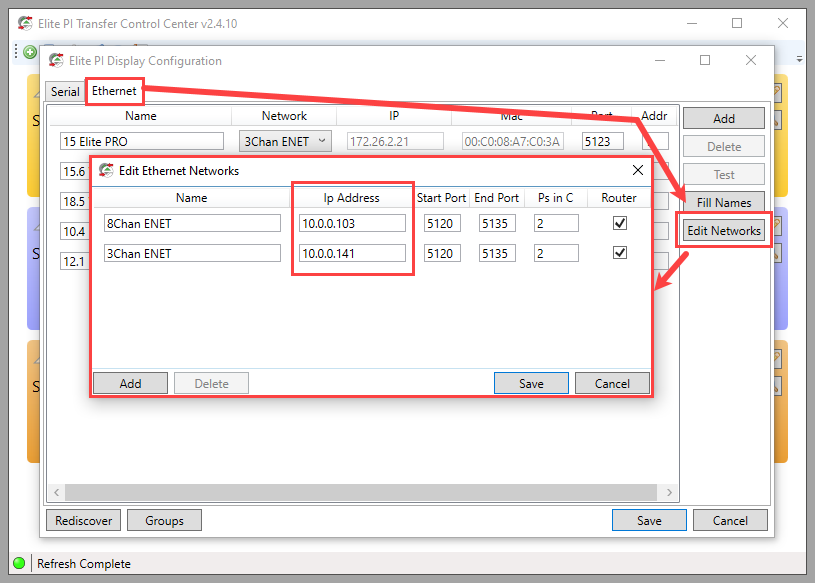
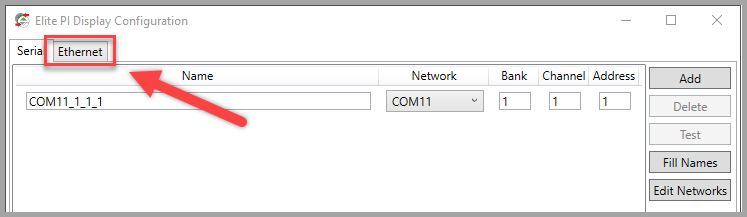
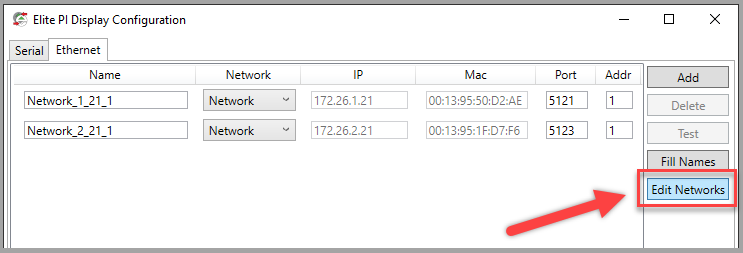
Click on the “Ethernet” tab then click on “Edit Networks”. This will open the “Edit Ethernet Networks” window. Here you will see the ENETs that have been previously setup in the Transfer program. You will want to change the IP address for any ENET that has had its IP address changed. *Please note, if the IP addresses listed here match the IP addresses listed in the WinBox program, then there is some other issue and you will need to contact support for assistance. Once you have updated all IP addresses, click “Save”
STEP 4.
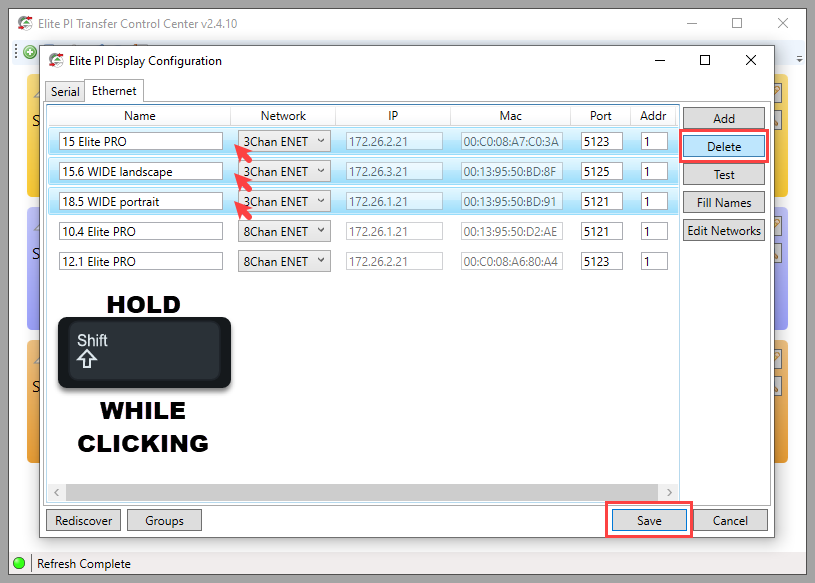
Now you are going to need to update the screens that you have listed in the “Ethernet” tab by preforming a rediscover. In the “Elite PI Display Configuration” Window, you will want to delete all Elite PI displays that were associated to that ENET or ENETs that you just updated the IP address information. While holding SHIFT, click in the space indicated in the image below and select all Elite PI screens that were associated with the affected ENET. Once they are highlighted in light blue, select “delete” and then click “save”.
STEP 5.
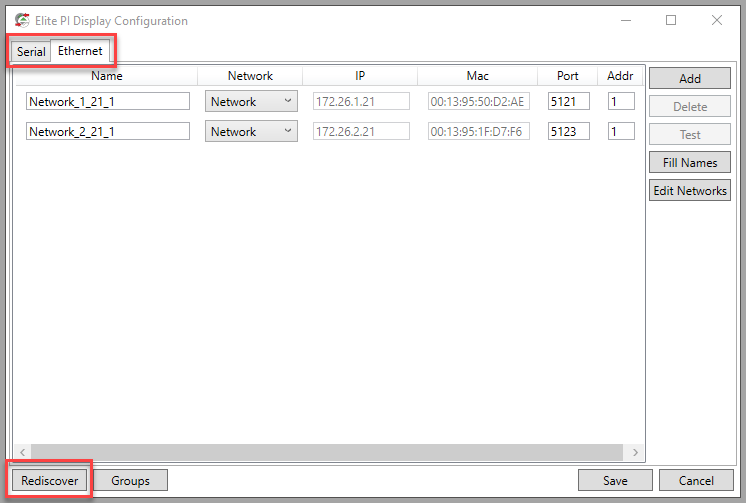
Now that the screens have been deleted, you will need to find them again and add them to the Transfer program. Just like in STEP 2, click “Edit Displays”. Again, just like in STEP 3, make sure that you are in the “Ethernet” tab. Click on the “Rediscover” button in the lower left of the window.
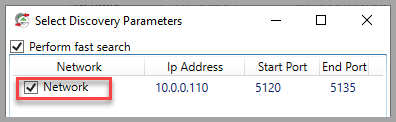
STEP 6.
You will now see a new window pop up. Here you will want to select the ENET or ENETs that you just updated the IP address settings.

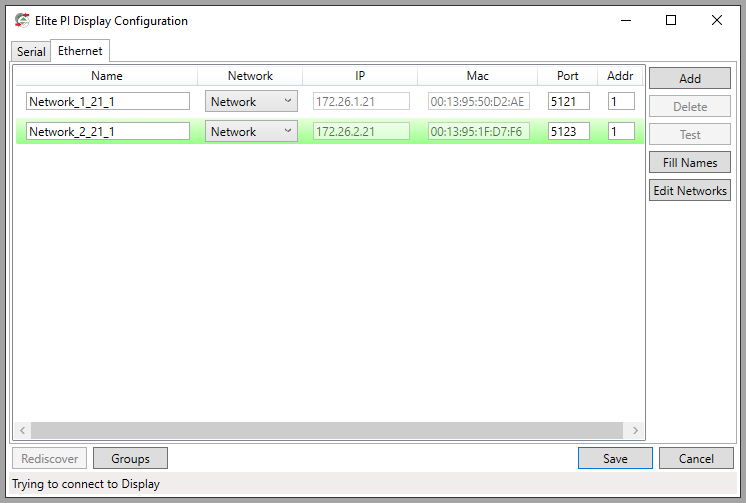
STEP 7.
The Elite PI Transfer Control program will now look for the displays connected to that ENET. When the program finds a display, it will highlight it green.

However, if the program finds no new screens, then you may see this error.

If that is the case, first try restarting the program and trying again. Otherwise, please contact support at techsupport@ceelectronics.com
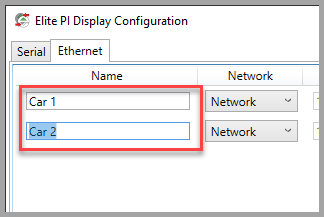
Now that you have the Elite PI screens added, or re-added, to the program, you can name them whatever you would like. and then click “save”.
STEP 8.
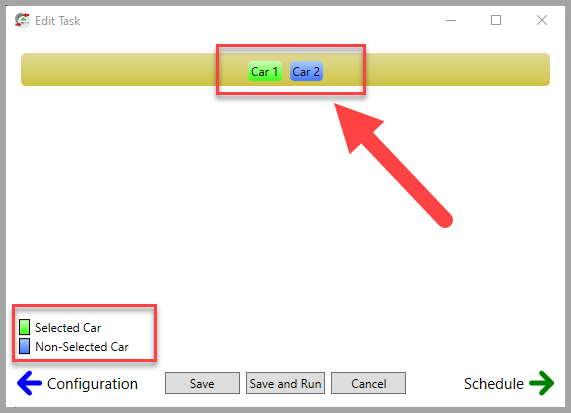
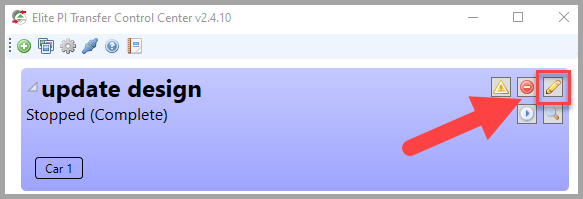
Finally, you will want to add this screen to any transfer tasks that may have contained the screens prior to deleting them. Locate your tasks that involve the car that you added and click on the “Edit” button

Click on “Displays”

And make sure that you select all of the cars that you want to add to this task. Click on “Save” to save the task, or click on “Save and Run” to save the task and then execute it and send the data to the screens.
If you have any questions, please feel free to leave a comment below, or email techsupport@ceelectronics.com
These following steps are all assuming that you have the Elite PI Transfer Control Center program installed on your computer and that the program is configured to communicate with all of the elevator screens on your property. If that is not done first, please reference one of our other guides or contact C.E. Electronics tech support at techsupport@ceelectronics.com
STEP 1.
Open the Elite PI Transfer Control Center program. Click on the “Add Task” button in the top left of the screen.
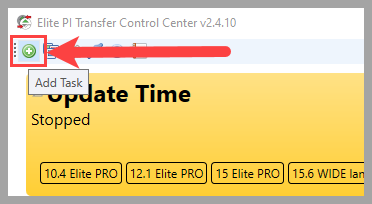
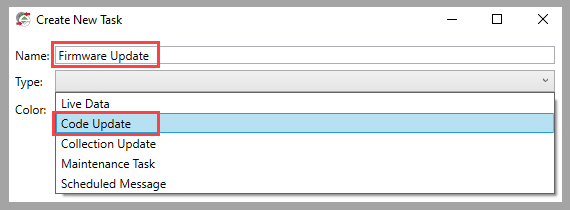
STEP 2.
Name the task “Code Update” or “Firmware Update”, then under “Type” select “Code Update”.
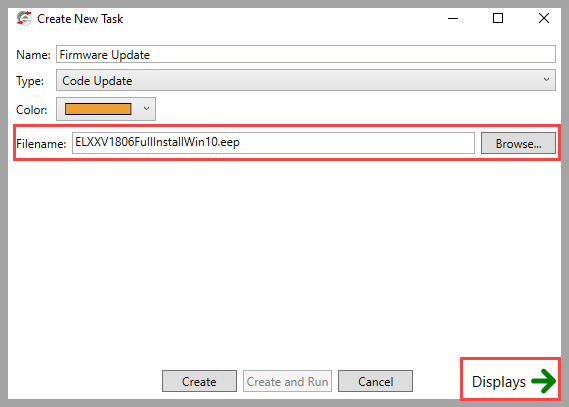
STEP 3.
Click on “Browse” and locate the .eep file that was sent to you from C.E. Electronics. Once you have selected the .eep file, click on “Displays”
STEP 4.
Select the screen that you need to send the code update to and click “Create and Run”
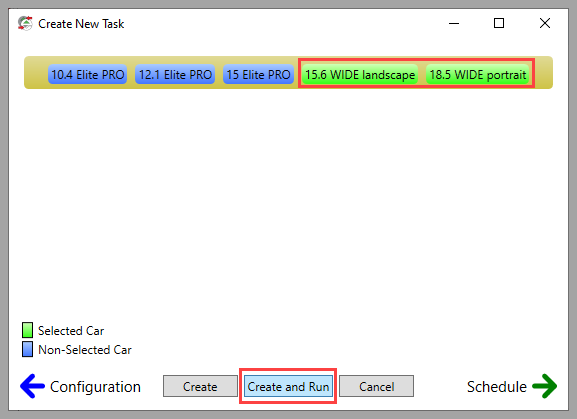
Once you click “Create and run” you will see the new task created in the main transfer page. The screens listed under the task will all turn green if the code update was pushed successfully. If the screens turn red, then there may be a communication or network issue and you should then contact C.E. Electronics tech support.
To see if your Elite PI screen is visible to the ENET, open the Mikrotik WinBox software. You can download the software here.
Download link >>> MikroTik Routers and Wireless – Software
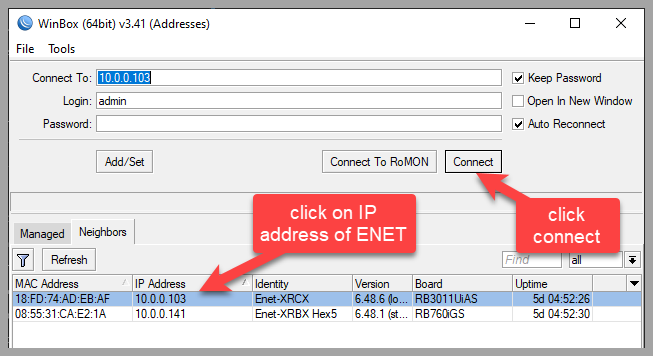
Once WinBox is opened, click on the IP address of the ENET that you need to inspect and then click connect. If you do not see any ENETs listed here, then make sure that you are in the “neighbors” tab and then try clicking “Refresh”. If no ENETs show up after that, then there is a good chance that your PC is not on the correct network. Please contact your IT department to ensure that you are on the same network as the ENET networking device. If you are on the correct network, then there may be a chance that the ENET is not connected to the properties network. Please contact your elevator mechanic to confirm the network connection.
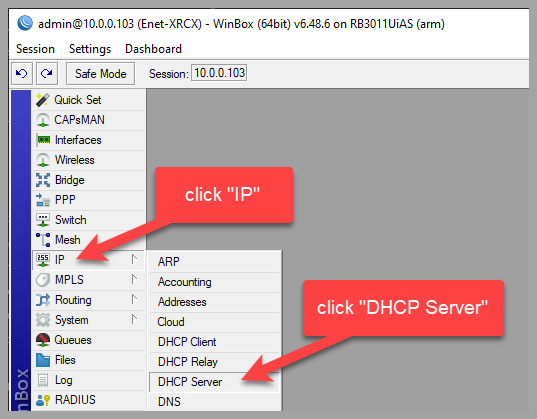
Then click on “IP” on the left list of options and click “DHCP Server” from the new list of options.
Make sure that you are in the “Leases” tab. This window gives you all of the information of the Elite PI screens that are connected to the ENET.
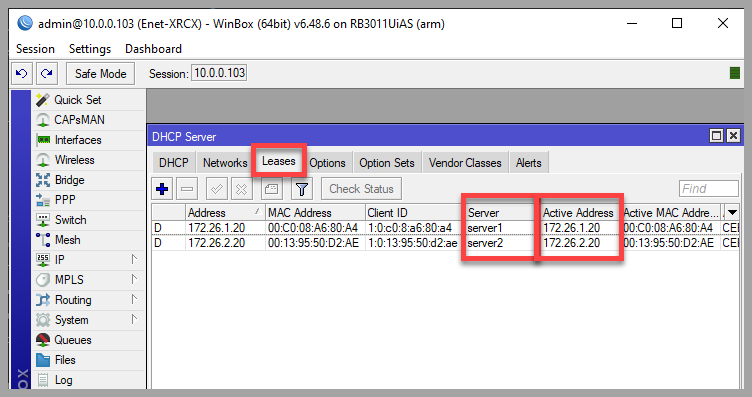
Here are some common issues that can be diagnosed in this window.
“I have 4 cars, but I only see 3 listed?” — If you have 4 elevators, but you are only seeing 3 listed items, then there is an issue with one of the Elite PI screens and its connection to the ENET. An elevator technician will need to troubleshoot the wiring and connectivity of the Elite PI and the LAN converter in the elevator cab.
“I see 2 duplicate server items” — If you are seeing 2 duplicate server items, such as server1, server2, server3, server3, server4, then there is a cross communication error and an elevator technician will need to contact C.E. Electronics.
“How do I know which elevator is listed” — To determine what elevator is listed, then the elevator technician will need to document which elevator is connected to which ENET channel. The “Active Address” section can help with this. Our ENETs will automatically assign an IP address to an Elite PI screen in the order of how they are connected to the ENET. Both addresses of 172.26.1.20 and 172.26.1.21 would be an Elite PI screen connected to the ENETs port 1 or channel 1. Both addresses of 172.26.2.20 and 172.26.2.21 would be an Elite PI screen connected to the ENETs port 2 or channel 2. So if you see 172.26.2.21 and the elevator technician has documented that Car B is connected to channel 2, then you would know that IP address is for Car B. Here is a helpful list of all of the used IP addresses and they associated networking ports.
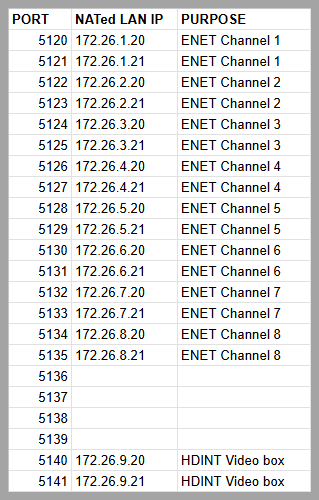
*Your IT department will need to make sure that they allow communication across ports 5120-5141 and port 8291 for communication between the PC and the ENET.
To check to see if your PC can view the ENET networking router, you can use a piece of software from MikroTik. Please follow these steps to check this.
Step 1.
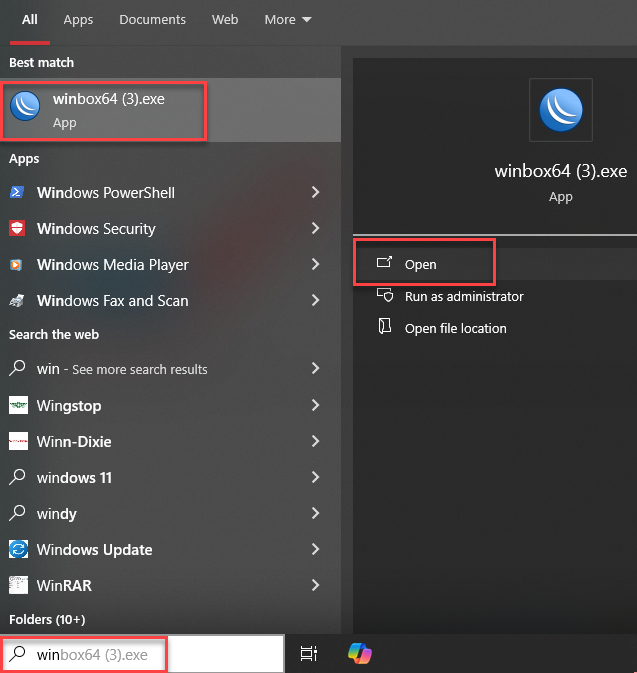
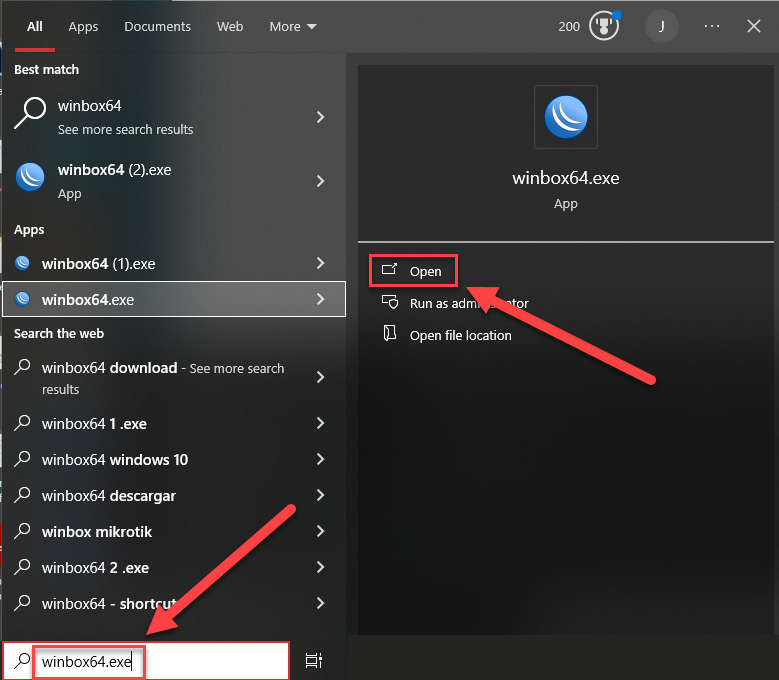
Check to see if you already have the WinBox application on your PC. This application is typically installed during ENET networking setup, so there is a good chance that you already have it. At the bottom of your screen, in the search bar, search for “Winbox64”. If you see it, click “open” to run the application. If you do not see it, go to step 2
Step 2
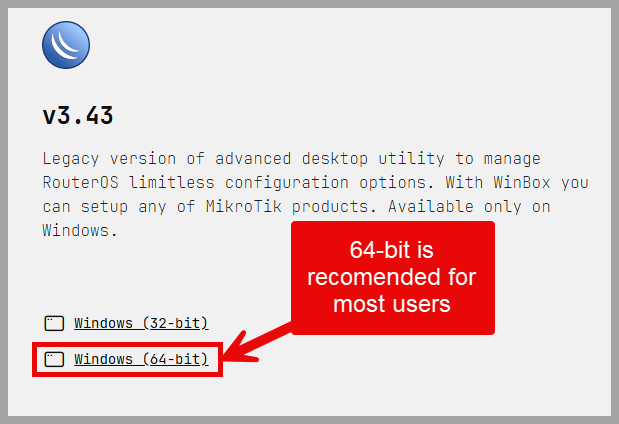
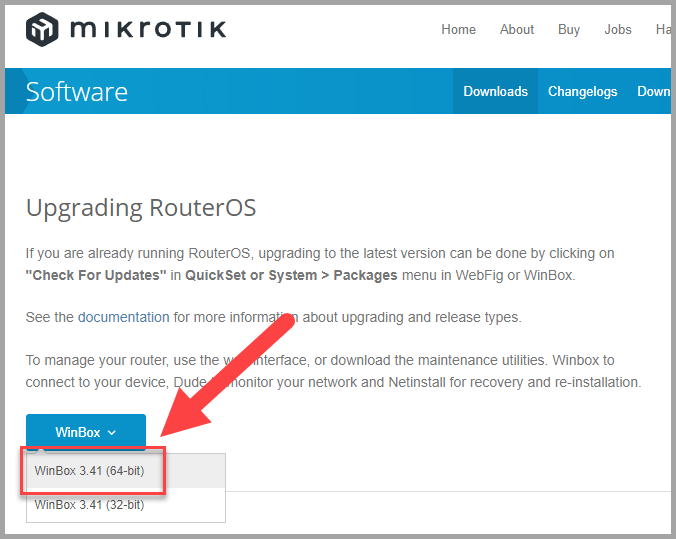
If you do not have the WinBox application already installed on your PC, you can download it from this link >>> https://mikrotik.com/download
Make sure that select the correct download. More than likely, you will be downloading the 64-bit option.
Now that you have downloaded it, you can go back to step 1 and open the application.
Step 3.
In the WinBox application, make sure that you are in the “Neighbors” tab.
If you see an IP address with the Identity of ENET, then you are on the same network as your ENET and your PC can see and communicate with it.
If you do not see anything listed here, then your PC can not see the ENET most likely due to being on the incorrect network gateway, or due to network restrictions put in place by your IT department.
If you do see an ENET listed here, but the IP address is showing 0.0.0.0, then this particular network was setup with DHCP network connections disabled. You will need to have your IT department contact techsupport@ceelectronics.com to configure the ENET networking router to a static IP address.
If you ever have an issue where a screen was removed and sent in for repair and now is not properly working in the Elite PI Transfer Control Center, then you may need to do a rediscover to find the screen. Please follow these steps to do a rediscover.
Step 1.
In the Elite PI Transfer Control Center program, click on “Edit Displays”

Step 2.
Depending on your hardware, your screens will either be listed in the “Serial” tab or the “Ethernet” tab. Locate which tab has the listings of your elevators. Please note, If you do not see any elevators listed, then the Transfer Control Center program may not have been setup on your network. If your system was installed after 2018, then you can reference this YouTube tutorial on how to setup an ENET networking router on your properties network. Connecting a PC to the C.E. Electronics ENET over a network connection (YouTube) For the purpose of this demonstration, I will assume that your elevators are listed in the “Ethernet” tab and that you are using our latest ENET networking hardware.
Click on the “Rediscover” button

Step 3.
You will now see a new window pop up. Here you will want to select the correct network or bank of elevators. If you are unsure as to which bank of elevators or network has the missing screen, then you can select all that are listed and then click OK
Step 4.
The Elite PI Transfer Control program will now look for the new display. If the program finds a display, it will highlight it green. There is your missing Elite PI elevator screen.
However, if the program finds no new screens, then you may see this error.
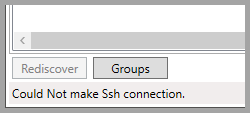
If that is the case, first try restarting the program and trying again. Otherwise, please contact support at techsupport@ceelectronics.com
Step 5.
Now that you have the Elite PI screen added, or re-added, to the program, you can name it whatever you would like.
Step 6.
Finally, you will want to add this screen to your transfer tasks. Click Save to save the changes that you made. Locate your tasks that involve the car that you added and click on the “Edit” button
Click on “Displays”

And make sure that you select all of the cars that you want to add to this task. Click on “Save” to save the task, or click on “Save and Run” to save the task and then execute it and send the data to the screens.

If you have any questions, please feel free to leave a comment below, or email techsupport@ceelectronics.com
In order for the Elite PI Transfer program to communicate with your elevator screens, your PC must be on the same network as the ENET networking router in the elevator control room. Alternatively, your IT department could set up special networking configurations so that your PC can still communicate with the ENET network. We will not be taking that setup into consideration when going through these steps. If that is the case, you may need to contact your IT department to see if your PC can communicate with the network that is connected to the ENET.
Step 1 – Open the Elite PI Transfer program and click “Edit Displays”
Step 2 – Click on the Ethernet tab
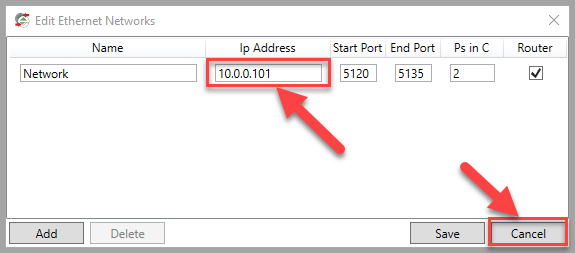
Step 3 – Click “Edit Networks”
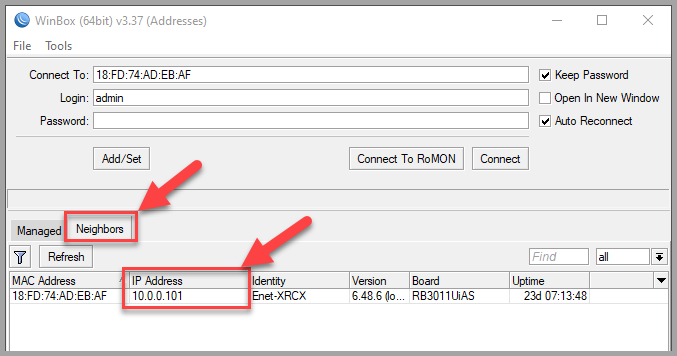
Step 4 – Make note of the IP address listed here. This is the IP address for the ENET networking router in the elevator control room. In this example, the IP address is 10.0.0.101. Please note, that your IP address will most likely be different. After making note of this IP address, you can click “Cancel”.
Bear in mind that this was the IP address that was used when the ENET was last configured. There is a possibility that the IP address has since changed. To know for sure, you can use the WinBox application to look for the ENETs IP address. Again, this is all only possible if your PC is on the same network. You can reference this guide to check the ENETs IP address with the WinBox application.
See the last article of this Section – Using the MikroTik WinBox application to check for and ENETs IP address
So now you have the IP address of the ENET, or at least what was last configured as the IP address. With this, we can determine the network gateway that the ENET is connected to. In this scenario, the gateway is 10.0.0.1. Now we will want to find out what your gateway is.
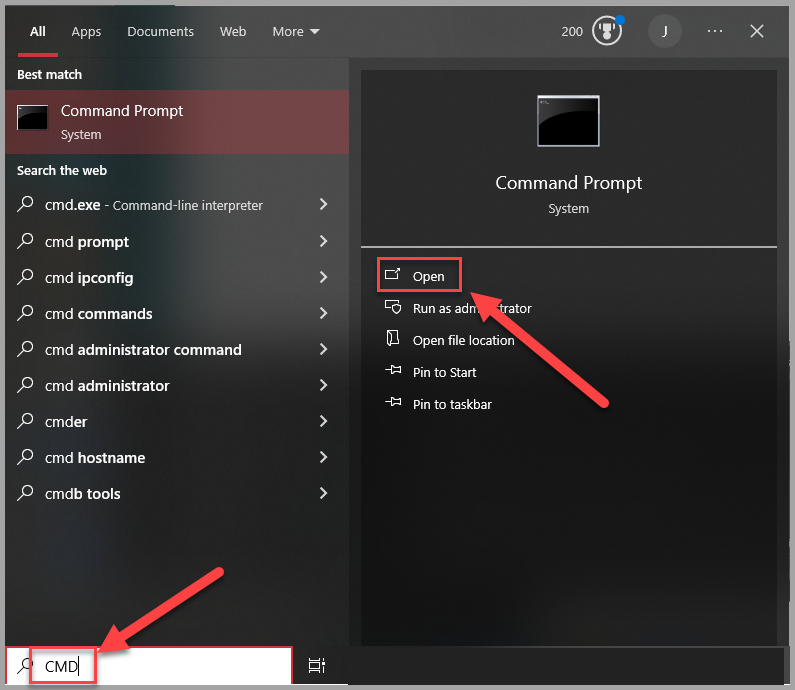
Step 5 – Using the Windows search, search “CMD” to open a command prompt window
Step 6 – Once in a command prompt window, type ipconfig just as it is in the image below and press enter. Then, look for your ethernet settings. Within your ethernet settings, you will see your networks “Default Gateway”. In this scenario, it is 10.0.0.1. This matches the gateway that we determined the ENET is connected to.
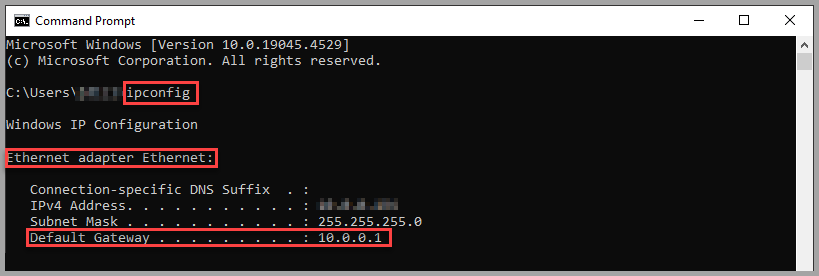
If these gateways match, then you are on the same network as the ENET networking router located in the elevator control room. If these gateways do not match, then you will need to contact your IT department and request access to the gateway that the ENET is connected to.
The WinBox application is a program that we use to access the ENET networking router settings. One of the most basic steps would to use the program to determine the IP address of an ENET. Follow these steps to find the IP address of an ENET that is connected to your same network. If you do not already have the WinBox application downloaded, you can download it here >>> MikroTik Routers and Wireless – Software

Step 1 – Open the WinBox application. The easiest way to do this is to search for the application in your Windows search bar.
Step 2 – When the program opens, it will either open in the “Neighbors” tab, or you will need to select the “neighbors” tab. Within the “Neighbors” tab, you will see all of the ENET networking routers on your network. For this example, the IP address for this ENET is 10.0.0.101. Please note that your ENET IP address will more than likely be different from this.
If you do not see any ENETs listed here, then your PC may not be on the correct network. If so, contact your IT department to ensure that your PC has access to the network that is connected to the ENET in the elevator control room.
Elite PI® Legacy Designer Software
If you find that your time and date are incorrect on your Elite PI PRO screen, it could be because the screen does not have a permanent connection to a PC that can send it automatic time updates. If your property is unable to establish this connection or you do not have the proper network connection, we recommend that you just remove the time and date from the screen design. To do this, follow these steps.
STEP 1.
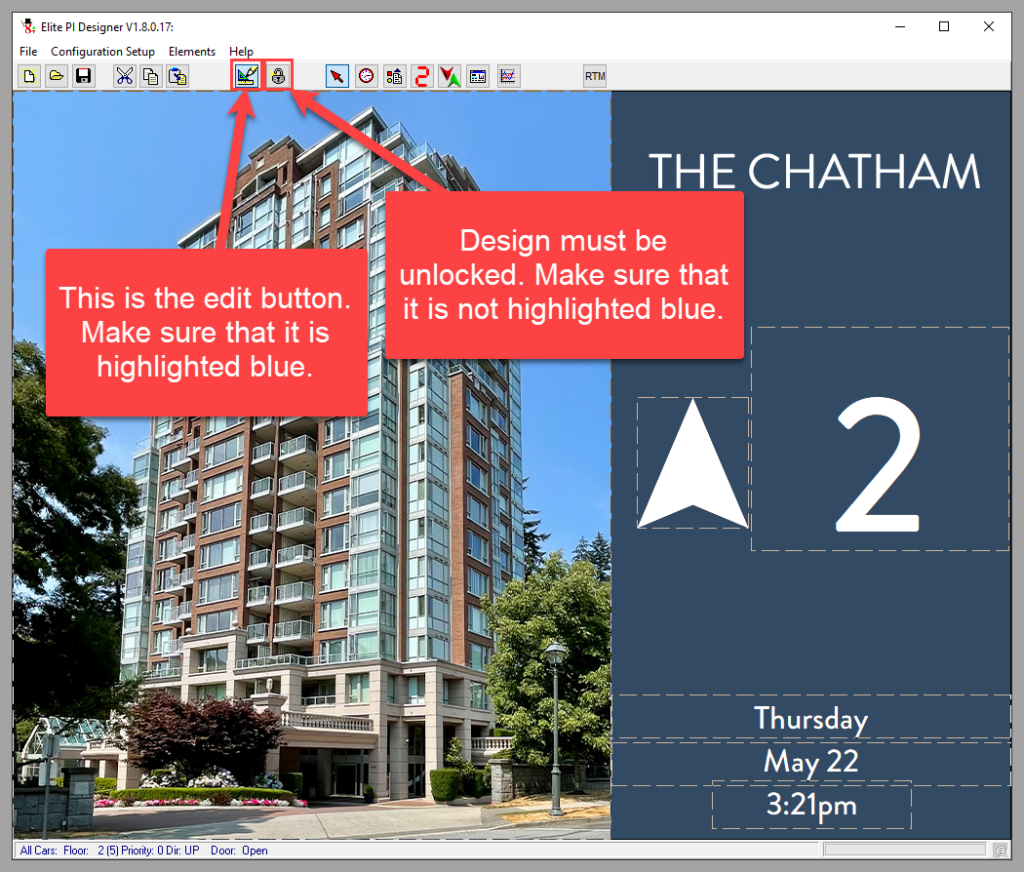
Open your design in the Elite PI designer program. Make sure that you are in edit mode and that the design is unlocked. You will know if you are in edit mode if the design assets have dashed lines around them and the lock icon is not highlighted.
STEP 2.
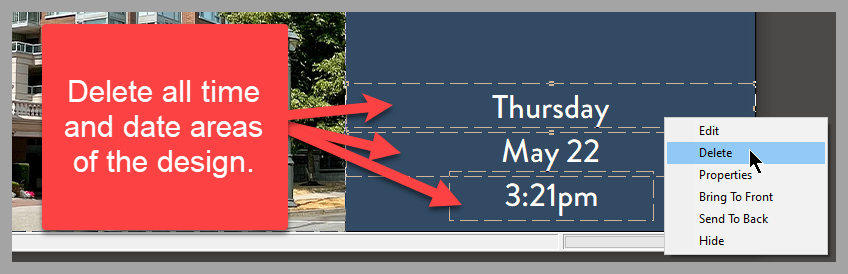
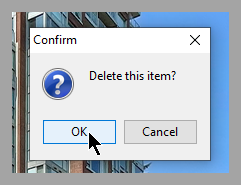
Right click on the time and date area of the screen design and select “Delete”. If you have more than one time and date area, you will need to delete them all. Make sure that you do not delete any other asset other than the time and date area.
When you see the confirmation pop up, click “OK”.
STEP 3.
When you are done, save your design.
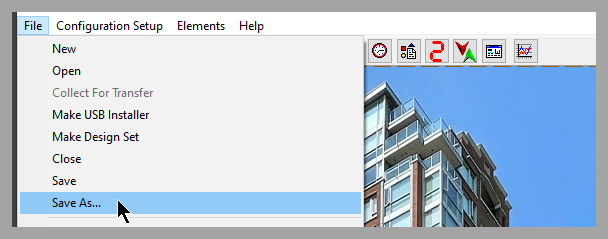
or you can make a USBInstaller. However, we always recommend saving before creating a USBInstaller.
You can now either update the screen with the USBInstaller via a USB stick directly on the ELite PI PRO screen, or you can use the transfer program to send that design to the screen.
See the next article >>> How to save a design as a USBInstaller file – C.E. Electronics
Or visit >>> YouTube
When you want to save a design as a USBInstaller.zip file so you can update your screens individually with a USB stick, please follow these steps.
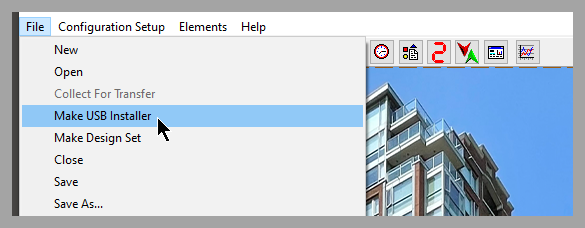
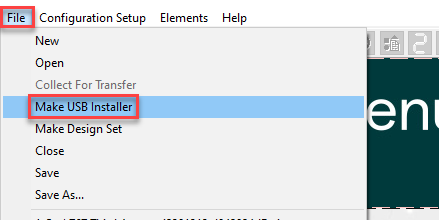
Step 1.
In the Elite PI Designer program, with your designed opened, click “File” and then click “Make USB Installer”
Step 2.
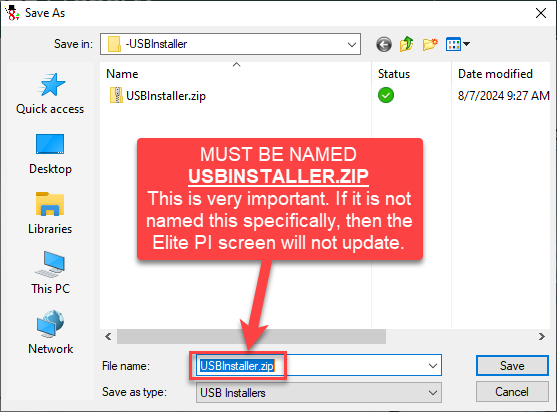
Next you will want to find a location to save the USBInstaller.zip file. It is recommended that you save this directly to a USB stick. Please note that this file MUST BE NAMED USBInstaller.zip. Do not try to open the .zip file, as it will be password protected. Just save this file to a USB stick. Also, make sure that the USB stick only contains this one USBInstaller.zip file and do not save more than one USBInstaller.zip files to a USB stick. Nothing else should be contained in the USB stick except for the one USBInstaller.zip folder.
Step 3.
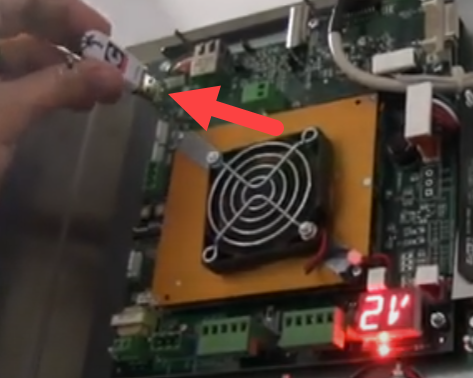
Take the USB stick with the USBInstaller.zip file and plug it into the back of your Elite PI screen. If your screen has a USB extension cable, then you can plug the USB stick into the port found in the service panel inside of the elevator COP
Step 4.
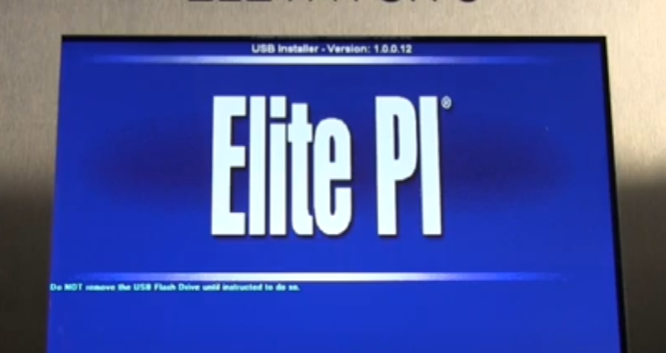
you will see a series of notifications come up on your screen. Do not remove the USB stick until instructed to do so.
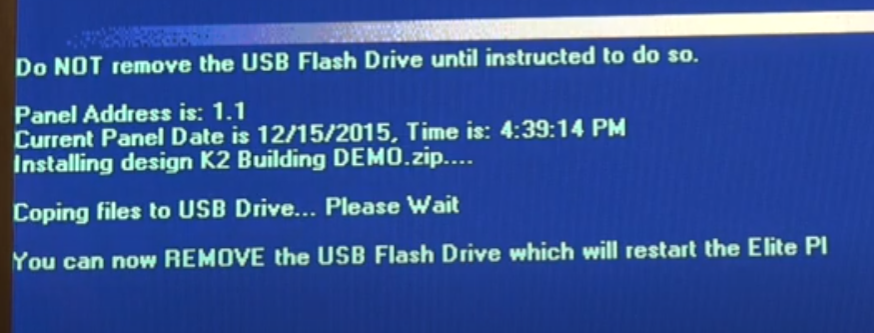
After you remove the USB stick, you should see your updated design.
If you have any issues with these instructions, please try following this YouTube tutorial.
If you are having the issue where a floor message appears for a short time after arriving at a particular floor, but it goes away too fast, then you can use the Elite PI designer program to ignore the door signal to show the message until the car leaves the floor.
1.Open your design in the Elite PI designer program
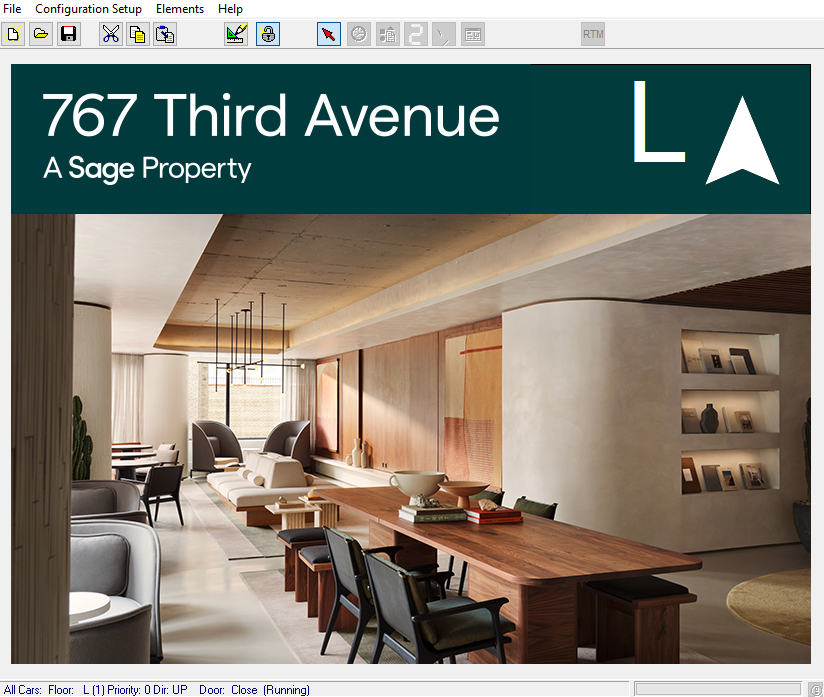
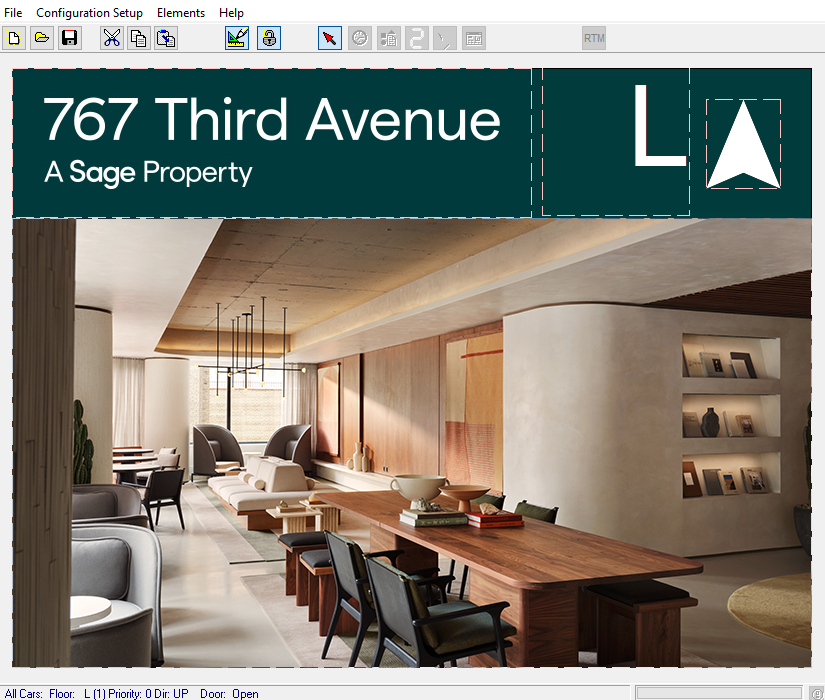
2. Make sure that your design is in the edit state by clicking the “layout state” button.

You will know this when you see the dashed lines around your design elements.
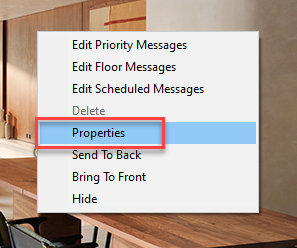
3. Right click inside of your message window, and click on “Properties”
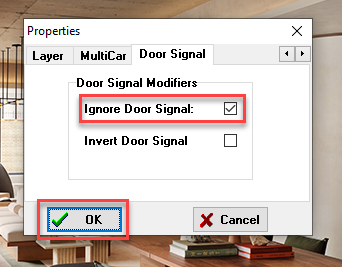
4. Click on the right arrow until you see the “Door Signal” tab

5. Check the box next to “Ignore Door Signal” and then click “OK”
Now the design will display the floor message until the car leaves that floor. Just save your design and send it to the screen with either the transfer program or via USB stick for the change to take effect.
Link to the video >>> Elite PI Designer ignore door signal
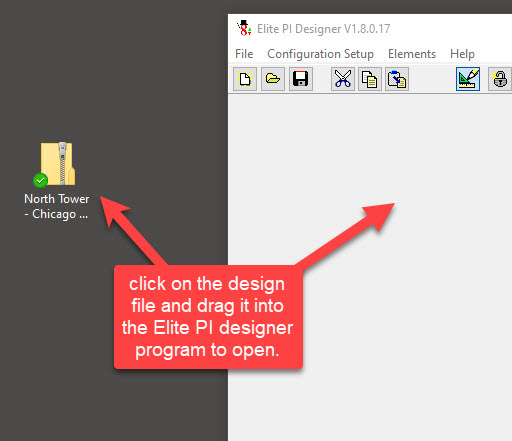
There are two simple ways to open an elite Pi design folder in the Elite PI designer program.
- Simply locate the design folder and drag it into the Elite PI designer program.
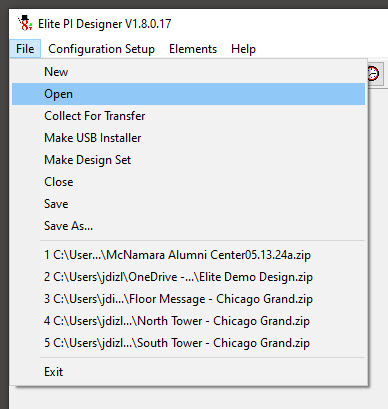
Within the Elite PI designer program click on the file tab and then click open to locate your design file.
Note that an Elite PI design file is a .zip file and should not be opened by double clicking on the file.